To start utilizing Sellenvo’s powerful multi-channel e-commerce tools, you must first create your primary user account. Sellenvo provides a straightforward and secure registration process to set up your corporate workspace, configure your regional parameters, and personalize your first-time onboarding experience in just a few simple steps.
Benefits
- Instant Workspace Setup: Quickly launch your dashboard using direct registration or Google single sign-on (SSO).
- Localized Configuration: Select your primary country during registration to align initial platform filters and system defaults.
- Onboarding Assistance: Gain immediate access to training materials or direct consultation upon account activation.
Step-by-Step Guide
Phase 1: Registration Form
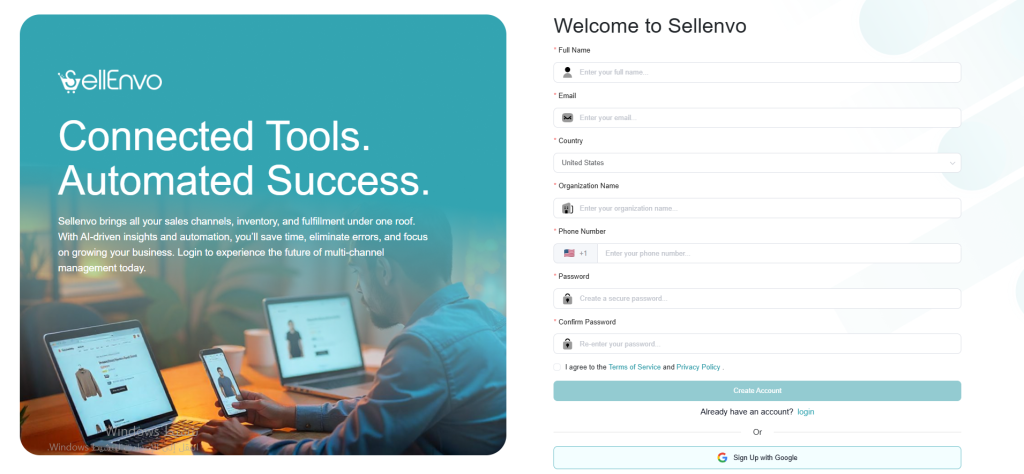
- Navigate to the Sellenvo portal and click on the “Register” or “Sign Up” option.
- Fill out the required registration fields with your business credentials:
- Full Name: Enter your first and last name (or company representative name).
- Country: Choose your primary country of business operation from the dropdown menu.
- Email Address: Enter a valid corporate or professional email address (this will be used for verification and login).
- Phone Number: Input your business contact number including the proper country code.
- Password: Create a strong, secure password for account protection.
- Alternatively, you can click the “Sign up with Google” button to authenticate instantly using your Google account.
- Click the “Create Account” button to complete the initial registration.
Phase 2: First-Time Onboarding Selection
Upon your first successful login, Sellenvo welcomes you with an interactive screen offering three paths to help you get started:
- Option A: Book a Free Consultation: Click this button to schedule a live, one-on-one session with a Sellenvo onboarding specialist to help integrate your stores.
- Option B: Watch Guide Videos: Select this option to open our comprehensive tutorial video library and learn how to navigate the system step-by-step.
- Option C: Skip to Dashboard: Click the “Skip” button (usually located in the top corner) to bypass the introduction and enter your active workspace immediately.
💡 Pro Tip: If you are configuring multi-channel synchronization for the first time, we highly recommend selecting “Watch Guide Videos” or booking a free consultation to ensure seamless setup.ion.